Account Setup
Customer admin setup
Work through Account Setup in Console — confirm details, invite and manage members, submit and verify SSO, connect Git access, and check billing and workspace-target readiness.
Last updated
Account Setup is where a customer admin gets a tenant ready for its first workspace. You confirm who you are, invite your team, hand ISM the non-secret details needed for identity and runtime, and watch each step turn ready. ISM reviews submissions and handles the secret-backed and operator-only work for you.
Open it from the Account Setup entry in the Console sidebar, or go to
/account directly. If you do not see Account Setup, you are signed in as a
workspace member rather than a customer admin — see
Access roles.
First ten minutes
You do not need to finish every integration at once. The goal is to leave enough accurate setup information that your first workspace can be created without repeated back-and-forth.
- Open Account Setup (
/account). The Overview hub shows a steps grid and a progress bar. - On Account details, confirm the team name, contacts, and intent.
- On Members, invite at least one teammate so you have a backup admin.
- If your team uses an external identity provider, submit and verify SSO details on Single sign-on. Otherwise leave it as invite-based access.
- On Billing, confirm billing is verified or trial-approved.
- Open Git access and connect the repository provider your team will use.
- On Workspace target, confirm the shared-hosted target shows Ready and not Waiting on ISM.
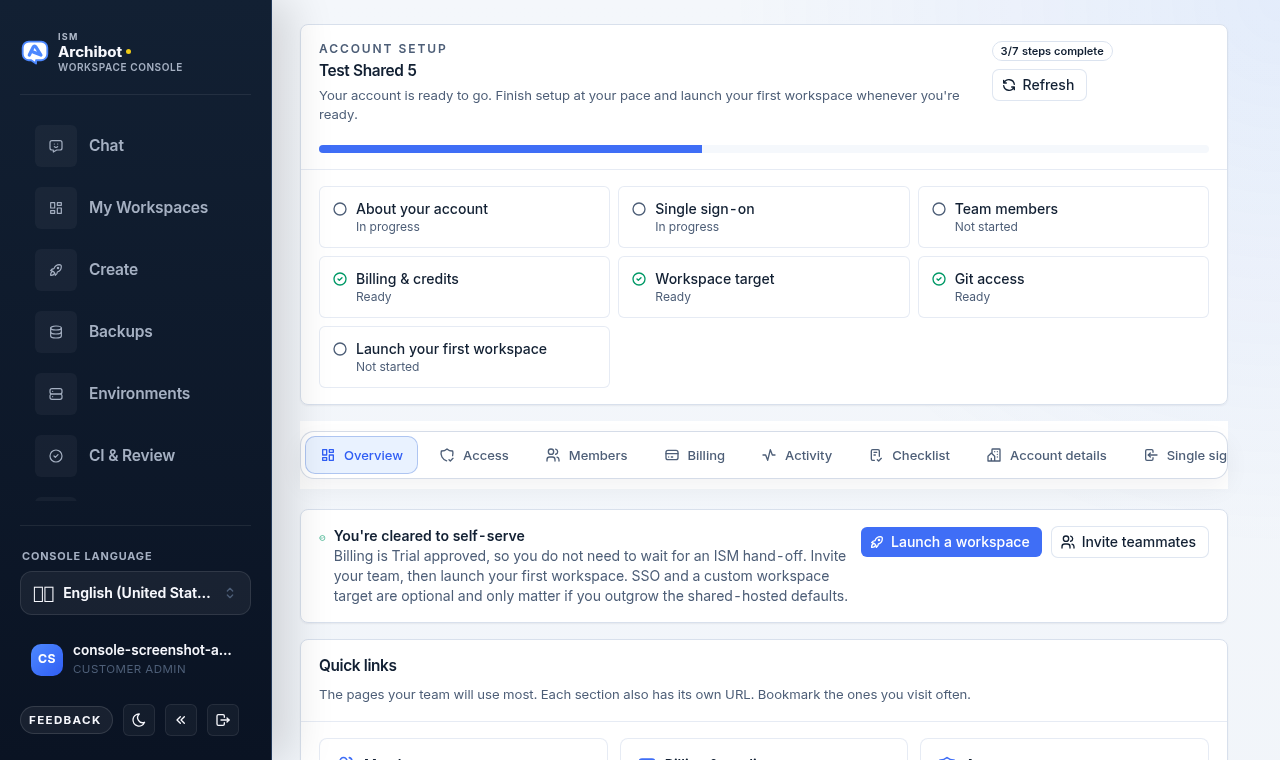
The Account Setup layout
The Overview hub puts the high-level steps grid at the top. Each tile — About your account, Single sign-on, Team members, Billing & credits, Workspace target, Git access, and Launch your first workspace — shows a status (Ready, In progress, Needs review, or Not started) and jumps to the matching section when you select it. A progress bar and a steps complete badge summarize where you are.
Below the steps grid is a row of section tabs. Each tab is also its own URL, so you can bookmark the pages you visit most:
| Tab | URL | What it covers |
|---|---|---|
| Overview | /account | Steps grid, member and billing summary, Git access, first-workspace launch, tenant summary. |
| Access | /account/access | Your account and tenant binding, plus the link to manage members. |
| Members | /account/members | Invite teammates and manage their roles and status. |
| Billing | /account/billing | Billing state, payment rail, and service plan readiness. |
| Activity | /account/activity | Recent lifecycle events and notifications for the account. |
| Checklist | /account/checklist | Every onboarding task ISM tracks, with per-task status controls. |
| Account details | /account/details | Identity, contacts, intent, and timing for ISM to use in setup. |
| Single sign-on | /account/sso | Submit and verify non-secret OIDC or SAML metadata. |
| Workspace target | /account/target | Review readiness of the operator-managed runtime target. |
The self-serve banner
When billing is verified or trial-approved and your team is on a small-team service tier, a green You’re cleared to self-serve banner appears at the top of Account Setup. It tells you that you do not need to wait for an ISM hand-off: you can invite your team and launch your first workspace right away. SSO and a custom workspace target are optional in this mode and only matter if you outgrow the shared-hosted defaults. The banner gives you Launch a workspace and, for admins, Invite teammates buttons.
If instead you see a Waiting for your account scope card, your sign-in is valid but Console does not yet see a customer or tenant for you. Wait a minute, select Check again, and contact onboarding if it persists.
Account details
Open Account details (/account/details) and fill in the customer-owned
profile ISM uses to tailor the rest of setup:
- Set the Primary contact name — the person ISM should reach for setup decisions.
- Add the Billing contact email and Technical contact email.
- Choose a Payment preference (trial first, prepaid credits, monthly or annual invoice, ACH, wire, credit card, or procurement review).
- Pick your Team size and Primary use (facilities/ARCHIBUS operations, developer workflows, or mixed).
- Choose When do you want to be live? so ISM can prioritize.
- Use the notes field for repos, databases, AI providers, or constraints to plan for.
- Select Save account details.
Do not put private credentials, payment card numbers, invite links, or internal-only negotiation notes in this form. Treat everything here as customer-visible.
Invite and manage members
Open Members (/account/members) to build your team. Invite at least one
other admin so the account is never dependent on a single person.
To invite someone:
- Enter the teammate Email.
- Choose a Role: Customer admin for people who should manage setup, invites, billing, and usage; Customer member for ordinary workspace users.
- Select Send invite.
Each row in Current members shows the member’s email, when they were last seen, their role, and their status (Active, Invited, or Disabled). The buttons on each row let you manage the member’s lifecycle:
- Promote to admin / Demote — change between customer admin and member.
- Disable / Re-enable — suspend or restore access without removing the member.
- Remove — take the member off the account entirely.
If a user opens an invite while already signed into an older or different identity-provider account, they may land on an access-denied page. Ask them to sign out of the identity provider, reopen the invite, then open Console after acceptance. More invite-acceptance recovery steps are in Troubleshooting.
Submit and verify SSO
Open Single sign-on (/account/sso) only when your team is ready to wire an
external identity provider. Small teams can keep using email invites instead.
Provide non-secret metadata so ISM can configure the connection:
- Choose the IdP type (or No SSO yet to stay on invites). Console can offer a Provider metadata lookup and links to open the provider console for common IdPs.
- Enter the Login domains your users sign in with.
- Provide the Discovery / metadata URL and an optional non-secret Provider app reference (application or client ID).
- Set the Username, Email, and Groups claims.
- Set the Admin group name and Member group name that map to customer admin and member roles.
- Add a Test admin email and Test member email so ISM can validate the login path end to end.
- Use Verify metadata to have Console reach the provider and confirm it found the expected fields. A readiness panel summarizes what still needs attention before submission.
- Add any SSO notes (approval windows, IP allowlists, claim quirks), then select Submit SSO setup.
Never paste OIDC client secrets, SAML private keys, signing material, passwords, cookies, raw tokens, or one-time links into this form. ISM exchanges secret material through an approved channel when secret-backed activation is needed.
Connect Git access
From the Overview hub, the Git access step connects the repository account Console uses for Create Workspace, CI review, Environments, and bot handoff. Select Open Git access settings to manage providers (GitLab, GitHub, Bitbucket, and others). The step shows a Git access ready or Git access needed badge and how many providers are configured.
WAR-backed workspaces can start without Git, but most team flows still need provider access, so connect at least one provider before creating Git-backed workspaces or running CI review. Provider connection details are in Create the first workspace.
Check billing readiness
Open Billing (/account/billing) to confirm funding. Workspaces start once
billing is verified or trial-approved and your prepaid workspace and managed-AI
balances are funded.
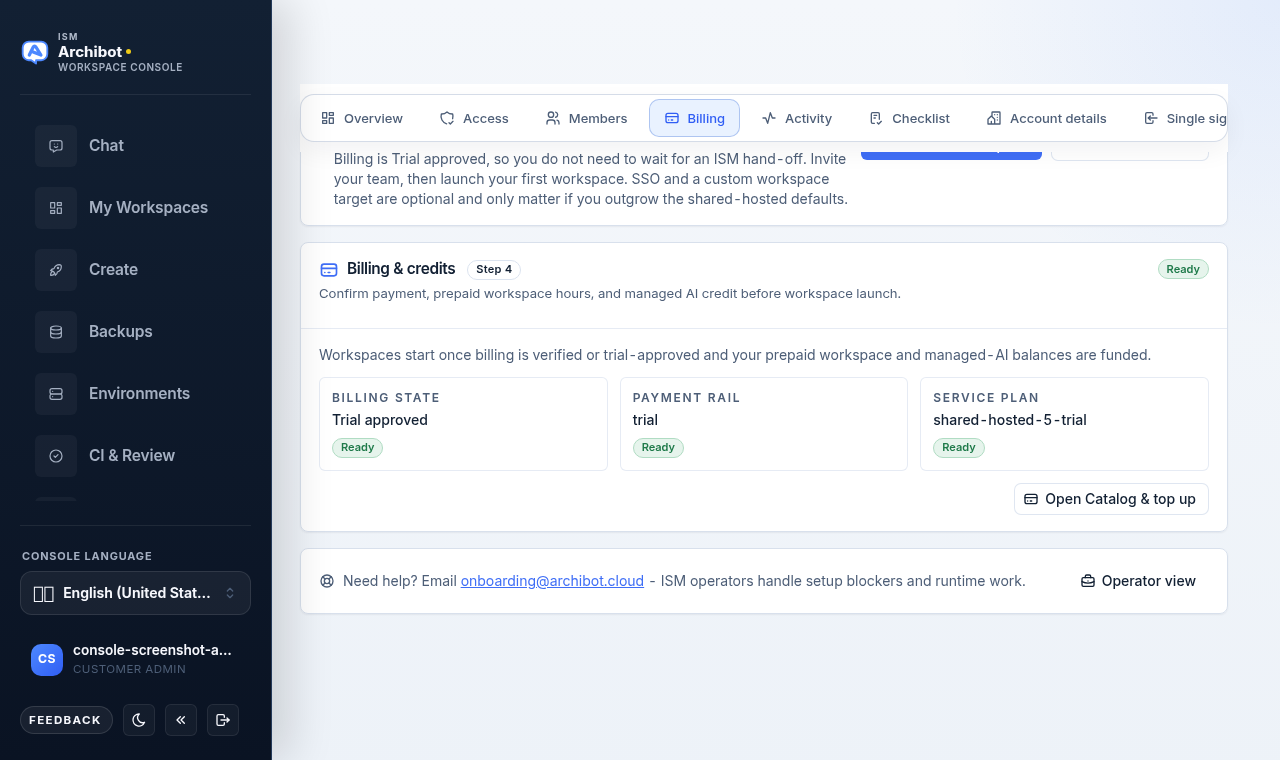
Three tiles summarize readiness:
- Billing state — for example Trial approved or Verified. This must be verified or trial-approved before launch.
- Payment rail — the payment method on file.
- Service plan — the shared-hosted tier (trial, team, or enterprise) or a dedicated plan.
Select Open Catalog & top up to fund prepaid workspace hours and managed-AI credit. Full details are in Catalog and readiness and Usage and billing.
Review workspace target readiness
For shared-hosted tenants, open Workspace target (/account/target). ISM
attaches and maintains the runtime target for your tenant; you review readiness
here but do not edit target credentials or templates.
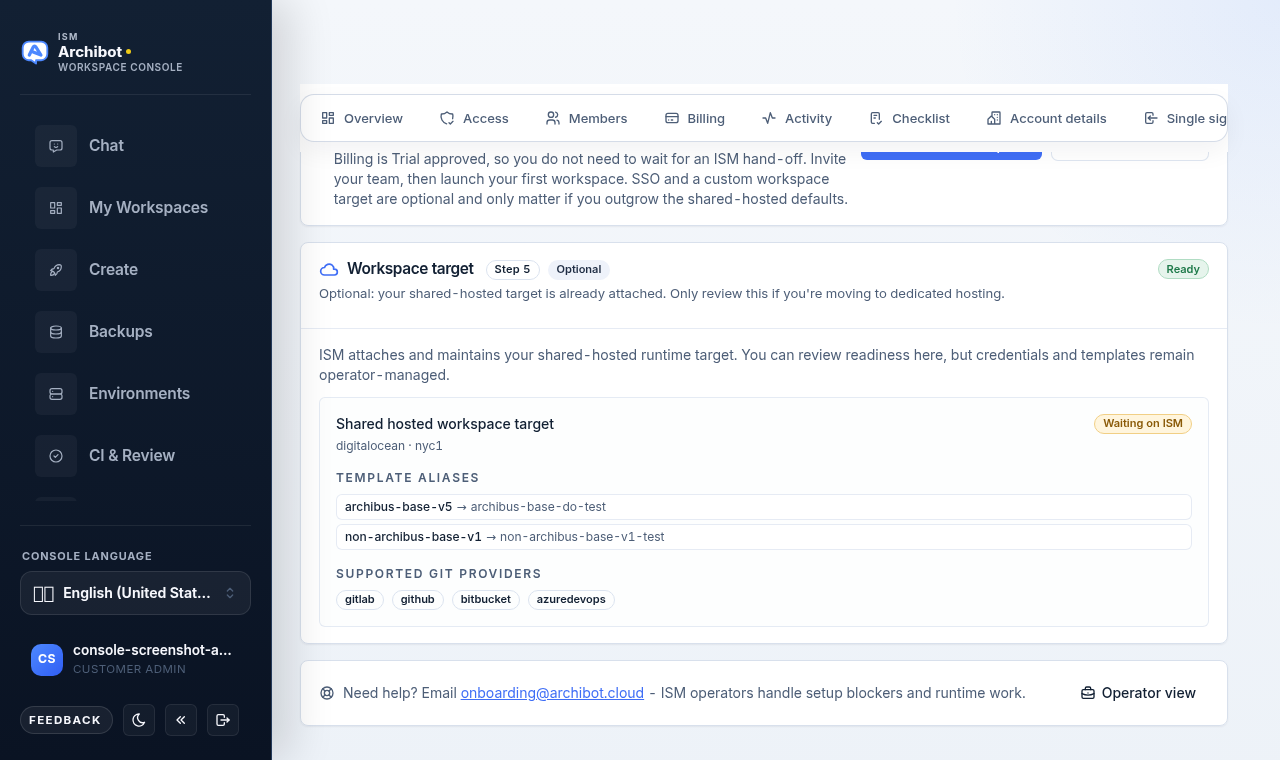
A ready target makes it clear that:
- ISM has attached the shared-hosted target for your tenant.
- The target can host workspaces for your account, with cloud and region shown.
- Template aliases map the logical templates you pick in Create to the real runtime templates.
- Supported Git providers are listed.
If the badge still shows Waiting on ISM, the customer side is done for now. If the target is missing entirely, ISM will email you when it is attached. In self-serve mode this step is optional and only matters if you move to dedicated hosting.
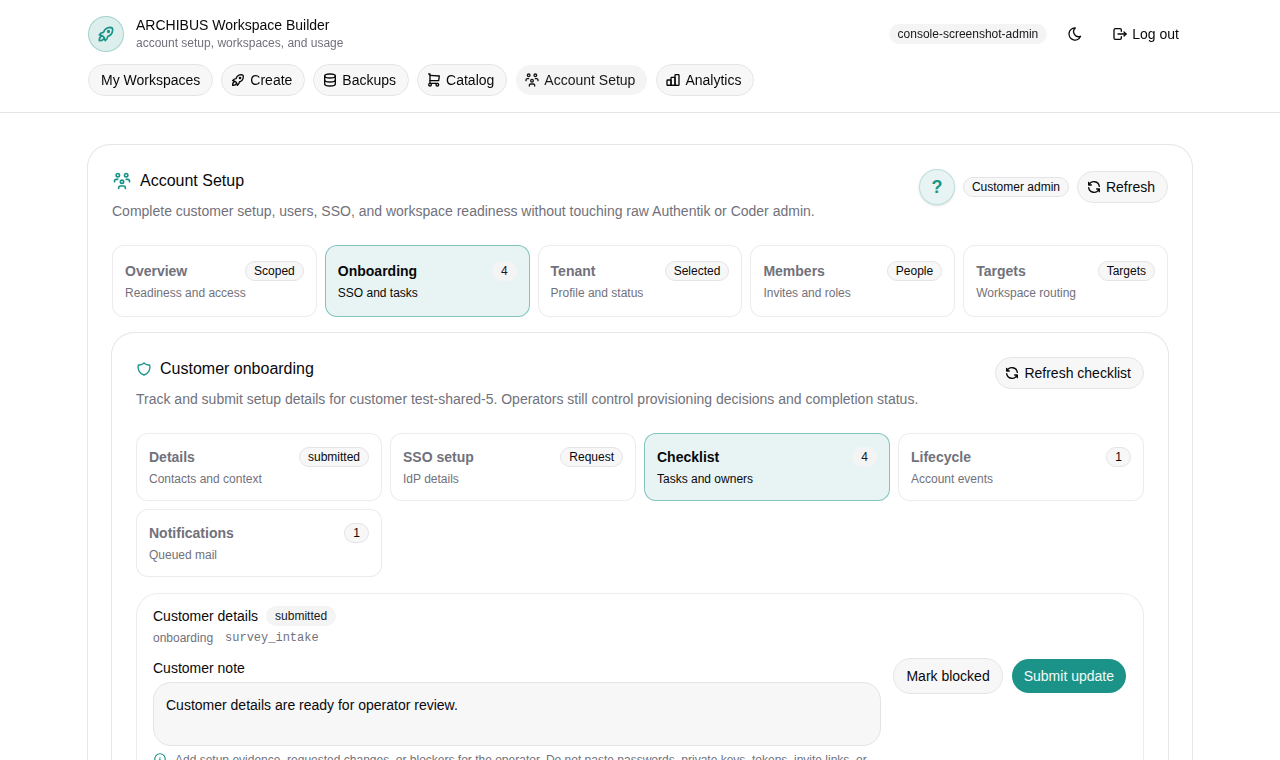
Work the detailed checklist
Open Checklist (/account/checklist) to see every onboarding task ISM
tracks for your account. The high-level steps on Overview roll these up, but you
can update individual items here.
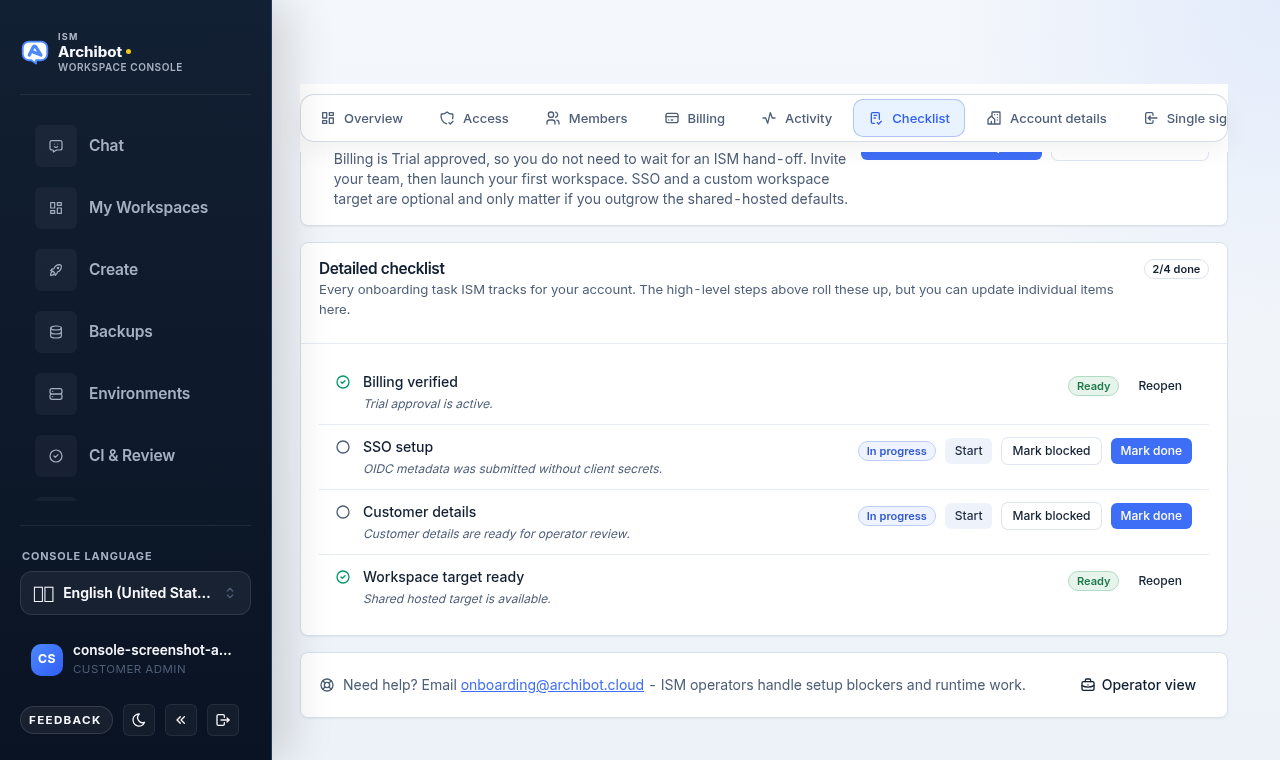
Each task shows a status and short note. Use the per-task controls to keep ISM’s view accurate:
- Start — move a not-started task into progress.
- Mark blocked — flag a task you cannot complete yourself.
- Mark done — confirm a customer-owned task is complete.
- Reopen — reopen a task that needs more work.
Some tasks are operator-owned and cannot be completed from the customer side. Leave those for ISM and mark blocked if they hold you up.
Items that require ISM review
A few items become active only after ISM review:
| Item | Why review is needed |
|---|---|
| Billing state | Workspace creation depends on verified, trial-approved, or prepaid status. |
| External SSO source | Secret-backed IdP activation must not happen through public notes. |
| Workspace target | For shared-hosted tenants, ISM attaches the target, template aliases, and routing. |
| Provider setup | Managed AI and customer provider accounts need billing and safety checks. |
When setup is blocked
Read the blocker text first. If it mentions billing, prepaid balance, SSO, workspace-target readiness, or template availability, retrying Create will not help until that gate is fixed. Mark the matching checklist task blocked so ISM sees it.
When you contact support, send the customer name, the blocked checklist item, the visible message, and the last action attempted. Do not send secret values or one-time links. See Support handoff for what to include.
Next steps
- Create the first workspace once setup shows ready.
- Access roles to confirm who can see Account Setup.
- Catalog and readiness to fund balances.
- Troubleshooting for invite-acceptance and access issues.
Done When
- Company and contact details are current on Account details.
- At least one customer admin can sign in, with a backup admin invited.
- First customer members are invited or active on Members.
- SSO details are submitted and metadata verified, or SSO is marked not required.
- Git access is connected, or you have confirmed workspaces can start without it.
- Billing is verified or trial-approved and balances are funded.
- Workspace target shows Ready, or the remaining blocker is clear.