Daily Work
Manage workspaces
Use My Workspaces to start, stop, update, launch, schedule, inspect, and delete workspaces without leaving Console.
Last updated
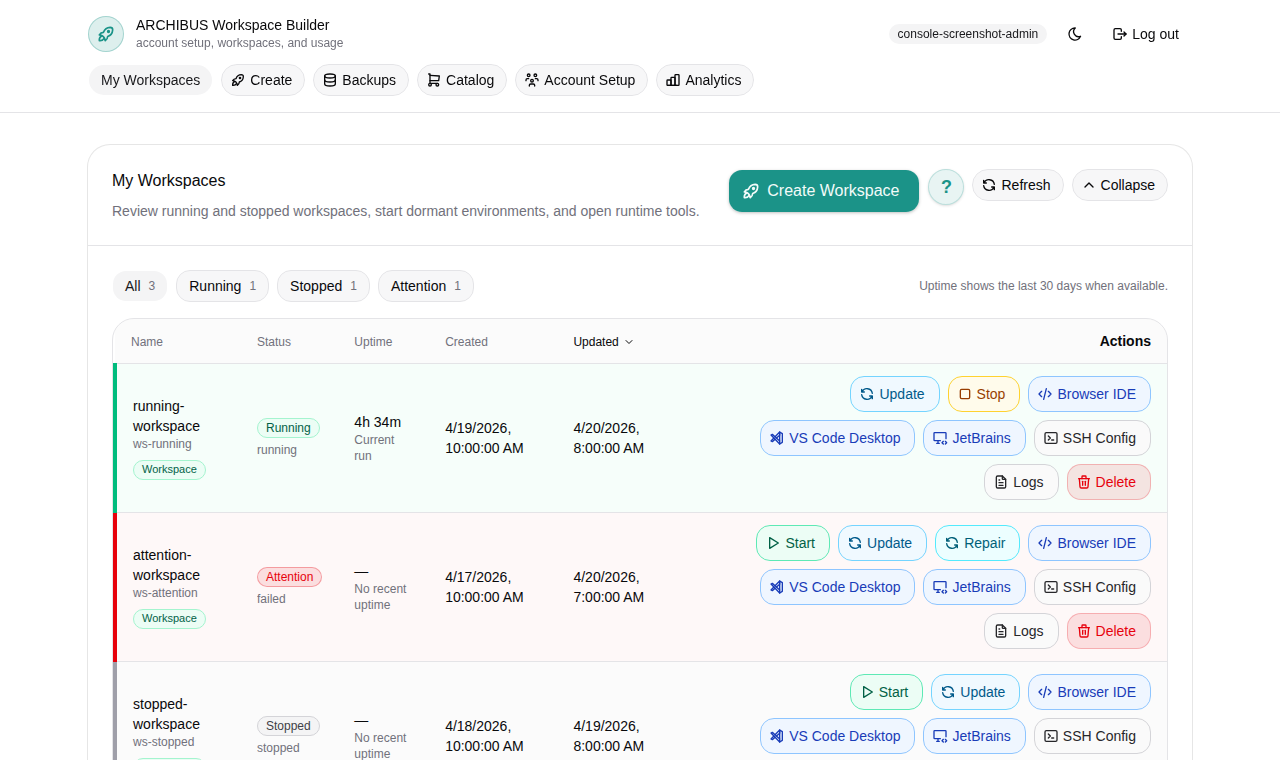
My Workspaces is the home page of Console (route /). It lists every workspace you can see, keeps key totals in view, and gives each row the actions you need for daily work: start, stop, update, launch an editor, view logs, edit the schedule, inspect details, and delete.
If you have not created a workspace yet, start with Create the first workspace.
Read the grid
The header shows My Workspaces with a count such as “4 of 4 shown” and a Polling indicator while Console refreshes status. From the header you can open Create Workspace, the Dormancy policy review (operators), and Refresh.
Below the header are three tabs:
| Tab | What it does |
|---|---|
| Workspace grid | The main list with per-row actions. Switch between Table and Cards, choose Columns, or Reset view. |
| Filter workspace list | Search and filter by status, owner, template, target, source, and update state. |
| Fleet summary | Totals that update with the current inventory and filter state. |
Each row keeps its status visible so you can act on it without opening another screen.
| Status | Meaning | Common action |
|---|---|---|
| Running | Runtime is active. | Open in Browser or Stop when done. |
| Stopped | Runtime is not active. | Start before working, or delete if no longer needed. |
| Starting or updating (Active build) | A build is running. | Wait for the result, or Cancel build. |
| Dormant | Idle past the customer dormancy window. | Start to activate it again. |
| Failed or unhealthy | A build or the runtime needs review. | Open Logs or Support before deleting storage. |
Stopped, dormant, and unhealthy workspaces stay in the grid so you can restart, update, inspect, or delete them from the same place.
Start a stopped or dormant workspace
- Open My Workspaces and find the stopped or dormant row.
- Click the Start action on that row.
- Wait for the status to become running. The grid polls automatically.
- Click Browser to open the in-browser editor.
Starting does not recreate the workspace. It brings the existing runtime back online with the storage and content it already had. Dormant rows use the same action to activate again.
Stop a running workspace
- Find the running row in My Workspaces.
- Click Stop.
- Confirm the status changes to stopped.
Stopping controls runtime usage and is different from delete. Storage and the workspace record remain according to platform policy. See Usage and billing for how runtime hours are metered.
Cancel an active build
When a build is running, the row shows Active build and most other actions are blocked until it finishes.
- Click Cancel build on the row with the active build.
- In Cancel active build, confirm with Cancel active build, or choose Keep build running to leave it alone.
Canceling stops the current build so another Start, Stop, Update, or Delete action can run.
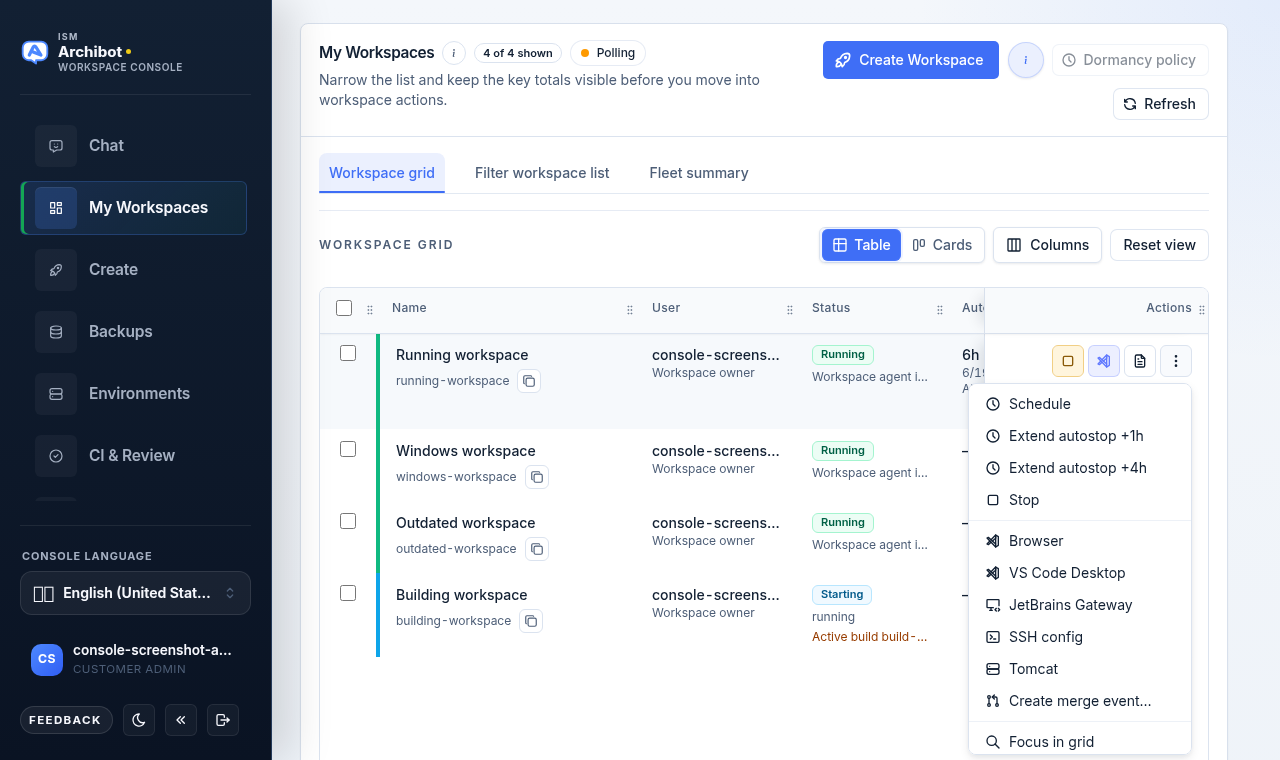
Launch an editor or runtime tool
Each running row has a Browser action for the default in-browser editor. The overflow (”…”) menu on the row holds the other launch targets:
- VS Code Desktop and JetBrains Gateway open editor deep links into your local tools.
- SSH config gives you an advanced terminal or editor connection.
- Remote Desktop opens RDP connection details for Windows workspaces (some Windows workspaces open Remote Desktop in the browser instead).
- Tomcat opens the application endpoint for workspaces that expose one.
Browser is the default path for most users. The full launch menu, with VS Code Desktop, JetBrains Gateway, SSH config, Remote Desktop, and Tomcat grouped under the overflow control, is not shown here; open the ”…” menu on any running row to see it.
Workspaces that expose a Git Health check also show a Git Health action so you can confirm repository status without opening a terminal.
Remote Desktop for Windows workspaces
For Windows workspaces, Remote Desktop opens a dialog with the RDP address to open in Microsoft Remote Desktop after the tunnel is ready, plus the command to run on the computer where your RDP client is installed. Remote Desktop stays private inside the workspace tunnel; do not expose RDP (port 3389) to the public internet. This dialog is not shown here.
Update safely
Use an update when you need newly baked editor tools, Archibot extension updates, code-server updates, or workspace runtime improvements. Running workspaces keep the image content they started with until they are updated or recreated.
- Click Update on a row that shows Update available.
- Console opens Review parameters and loads the update plan.
- Compare Current version and Active version, and read the Update reasons.
- Confirm the Credential refresh notice: managed credentials are refreshed without exposing secret values, and Secret values hidden stays in place.
- Review the Parameters table. Adjust any value marked Will change or Preserved; managed fields stay hidden.
- Click Run update only when the plan is correct, or Close to back out.
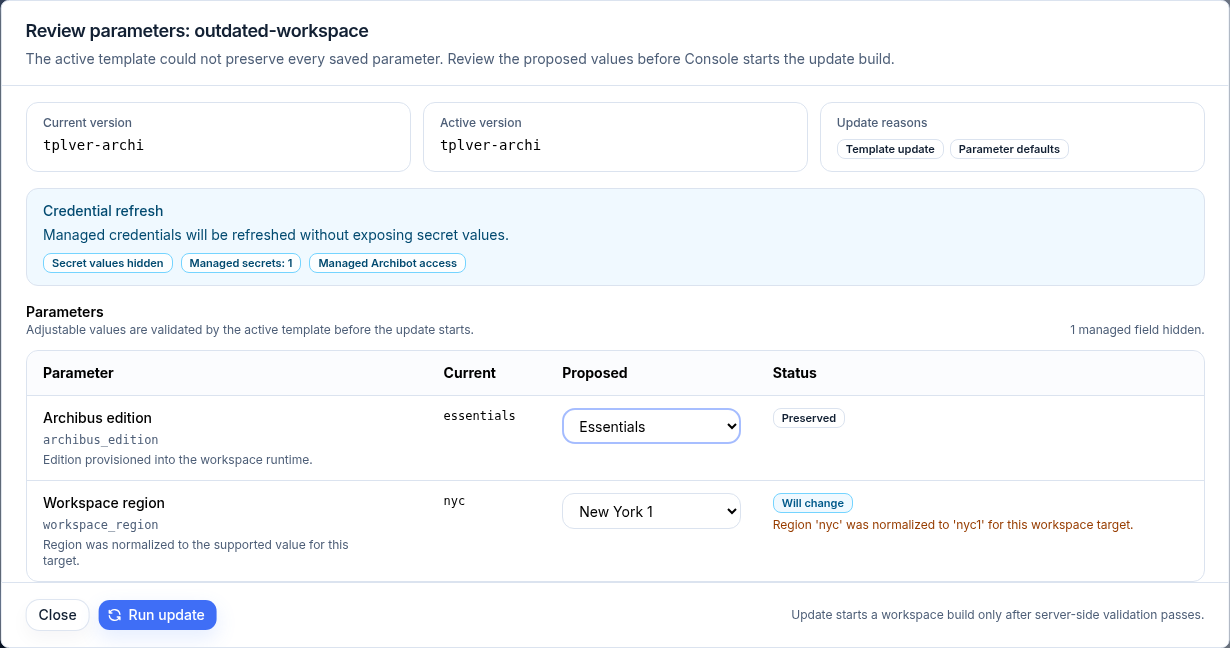
Adjustable values are validated by the active template before the update starts, so fix any field error in the review instead of starting the build repeatedly. Update starts a workspace build only after server-side validation passes, then opens the build log.
Edit the schedule
The schedule controls when a workspace starts and stops on its own.
- Open the Schedule action on a row.
- Review the current Status, Autostop, and Autostart cards.
- Use a Preset choice (Manual, Workday, Daily QA) to set a known shape, then adjust the fields.
- Set the Autostart schedule (leave empty to disable autostart) and Autostop after start in hours.
- Optionally set Automatic updates and a New active deadline.
- Click Apply schedule, or Close to discard.
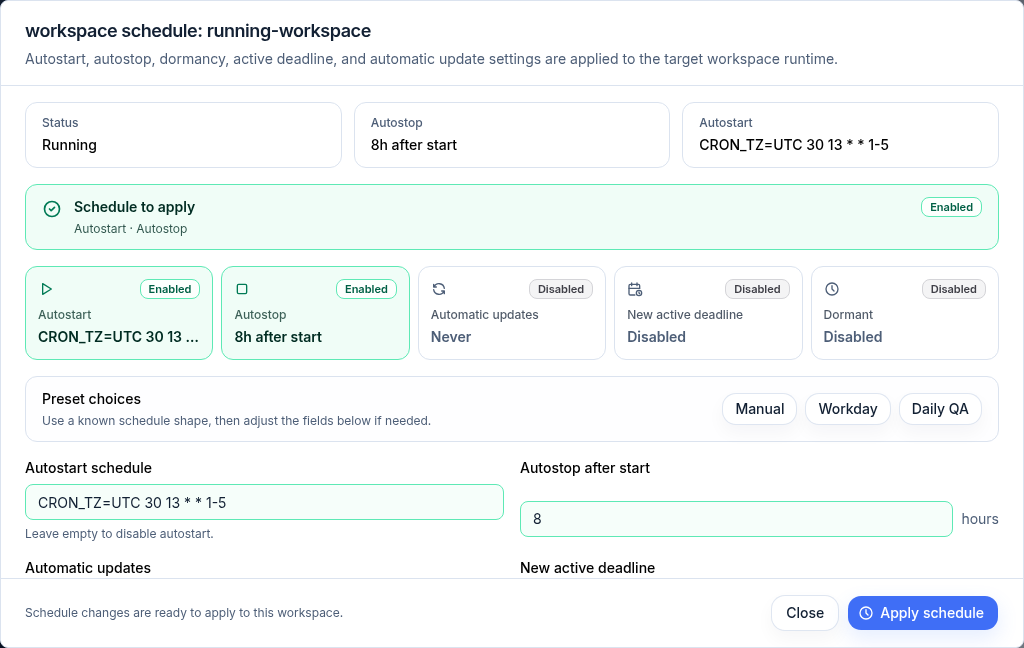
Autostart, autostop, dormancy, active deadline, and automatic update settings apply to the workspace runtime once you apply them.
Watch and extend autostop
The grid includes an Autostop in column that shows how long until each running workspace stops on its own, with the exact stop time underneath. A workspace with no autostop deadline shows ”—”. Sort by the column to find the workspaces stopping soonest.
To keep a workspace running longer without opening the full schedule editor, use Extend autostop:
- In the grid, open a running row’s ”…” menu and choose Extend autostop +1h or +4h.
- In Details, use the +1h / +4h / +8h buttons next to the autostop time.
Each extension pushes the active deadline out from its current value (or from now if none is set) and refreshes the row. It changes only the current run; the recurring autostop you set in Edit the schedule stays the same.
Inspect details
The Details action opens a read-only snapshot plus a place to keep Console notes.
- Open Details on the row you want to inspect.
- Review Status, Agent, Owner, Uptime, Autostop in, Template, Target, Updated, Source, and Git Health cards.
- Use the launch row (Browser, VS Code Desktop, Tomcat, Logs, Support) to jump straight into a tool.
- Optionally set a Display name and Comment for this workspace record, then click Save details.
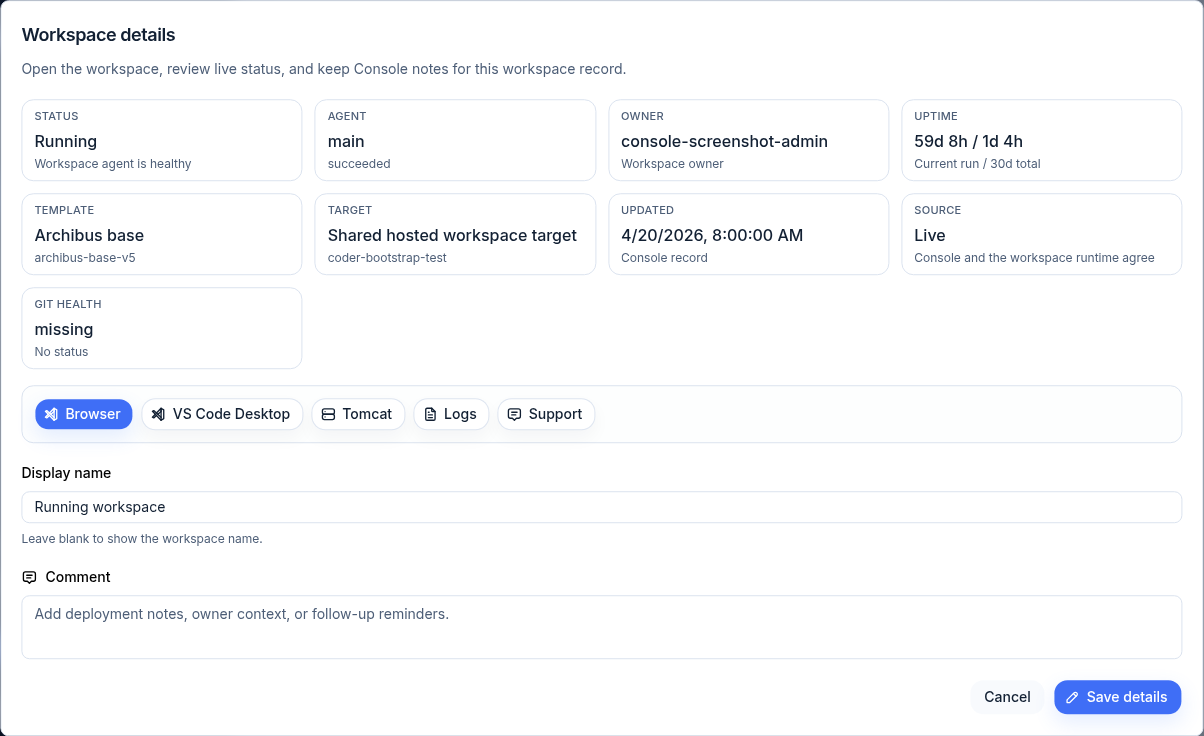
The display name is Console-only; leave it blank to show the workspace name. Use the comment for deployment notes, owner context, or follow-up reminders.
View logs
When a build fails or the runtime looks wrong, open Logs from the row or from Details.
- Runtime mode tails the main agent log stream for the workspace.
- Build mode shows the most recent build output.
Use the reload and download controls to refresh or save the current log as text.
Open workspace support
Use Support when a row shows failed, unhealthy, or unclear runtime state.
- Open Support on the workspace row, or from Details.
- Review the top cards: Workspace, Target, Build, and Runtime agents.
- Scan Health checks (workspace agent, latest build, runtime pod), Runtime agents, Storage, Shared Drive, Managed access, Workspace integrations, and Usage.
- Use Runtime logs or Build logs to dig in, or Update workspace when prompted to attach a writable Shared Drive mount.
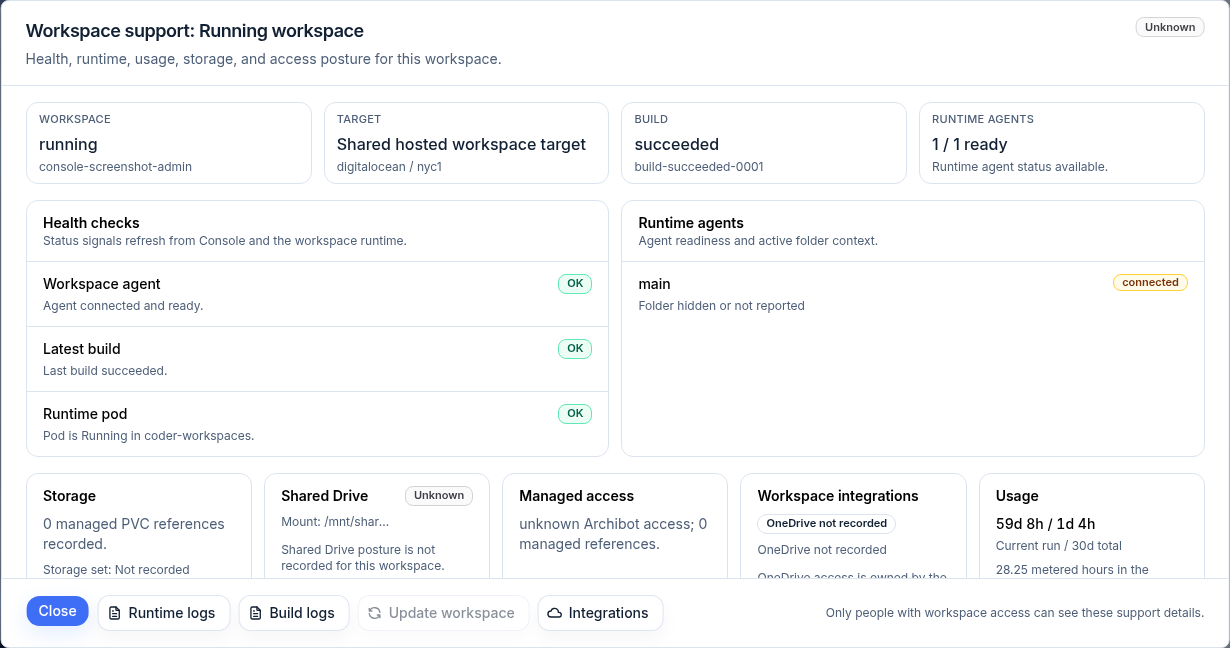
Only people with workspace access can see these support details. The support panel is the right place to gather facts before a support handoff.
Delete a workspace
Delete only when you intentionally want the managed workspace removed.
- Open the Delete action on the row.
- In Delete workspace, read what will be removed: the Archibot workspace and its managed runtime resources. This cannot be undone from Console.
- Type the exact workspace name to confirm. The delete button enables only after the name matches.
- Confirm the deletion.
Do not manually delete PVCs, pods, Kubernetes Secrets, or workspace runtime objects for a normal customer delete. Use the Console delete action so cleanup follows the supported path. If cleanup appears stuck, include the workspace name, status, and last action in your support handoff.
Bulk actions
When you select multiple rows with the row checkboxes, Console shows a bulk action bar with the selected count.
- Choose Start, Stop, Update, Cancel builds, or Delete.
- Each action applies only to selected workspaces that are eligible for it; Console shows an eligible count.
- Bulk delete requires typing DELETE to confirm. The bulk delete confirmation is not shown here.
- Console runs the operation one workspace at a time and keeps any failed rows selected so you can retry.
Use Clear to drop the current selection.
Dormancy policy (operators)
Platform operators can open Dormancy policy from the header to review idle workspaces against each customer’s cleanup window.
- Open Dormancy policy.
- Review the counters: Checked, Candidates, Dormant, Delete, Missing, and Applied.
- Under Customer policy setup, set Mark dormant after and Delete dormant after days (presets cover common windows such as 30 / 90), then Save policy.
- Choose Apply dormant marks, Apply dormant deletes, or Clear missing, then Preview before Apply dormancy actions.
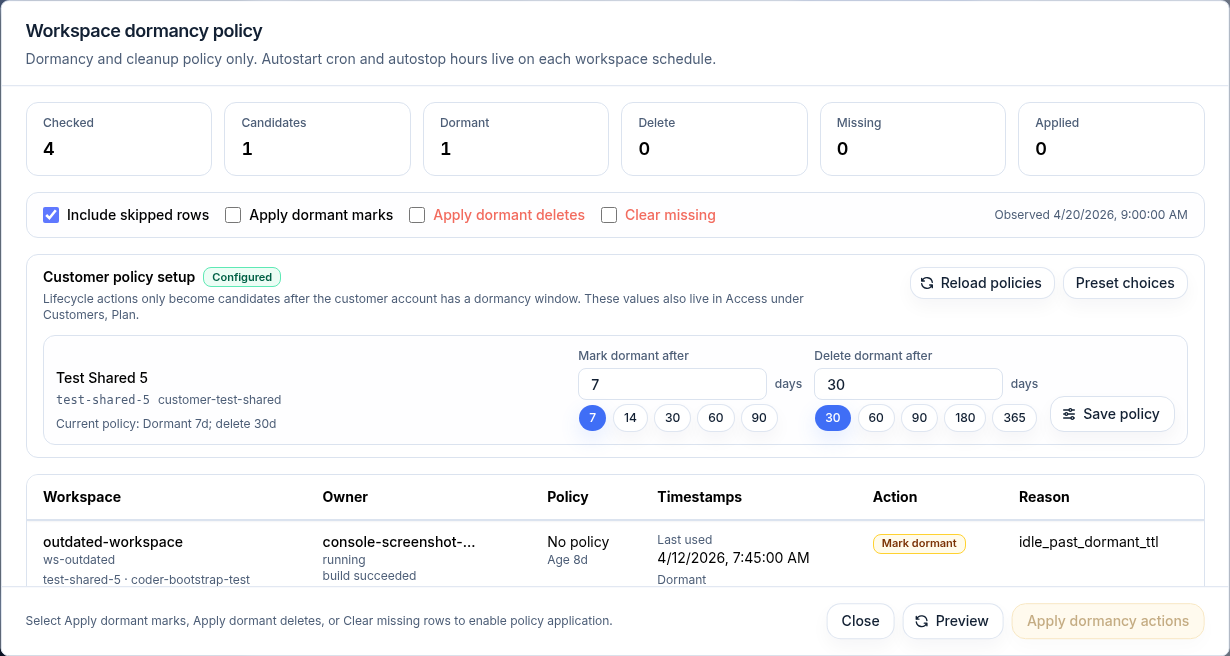
Dormancy is a cleanup and idle policy only; autostart cron and autostop hours live on each workspace’s schedule. Policy actions only become candidates after the customer account has a dormancy window, and those values also live in Access under Customers, Plan. Dormancy policy actions require platform operator access.
Related guides
- Create the first workspace — provision a workspace before you manage it.
- Catalog and readiness — confirm templates and targets are ready.
- Usage and billing — see how runtime hours are metered.
- Troubleshooting — first steps when a workspace looks wrong.
- Support handoff — what to gather before contacting support.
Done When
- The workspace row shows the expected status.
- Start is available for stopped or dormant workspaces.
- Stop is available for running or starting workspaces.
- Review parameters finishes before a build starts.
- Delete confirmation matches the workspace you intend to remove.