Workspace Start
Create the first workspace
Pick a template family, work the four-tab Create wizard, set repository or WAR source, runtime, database, and integrations, then create and watch the build.
Last updated
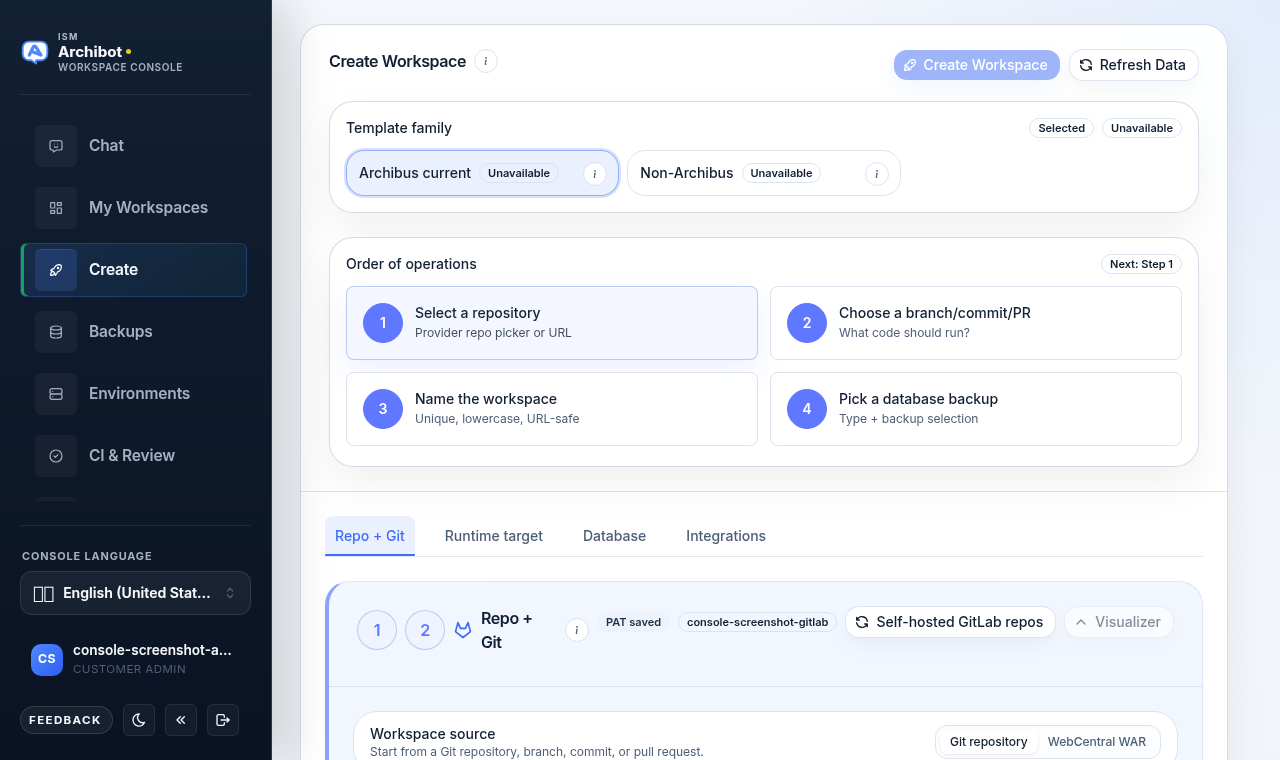
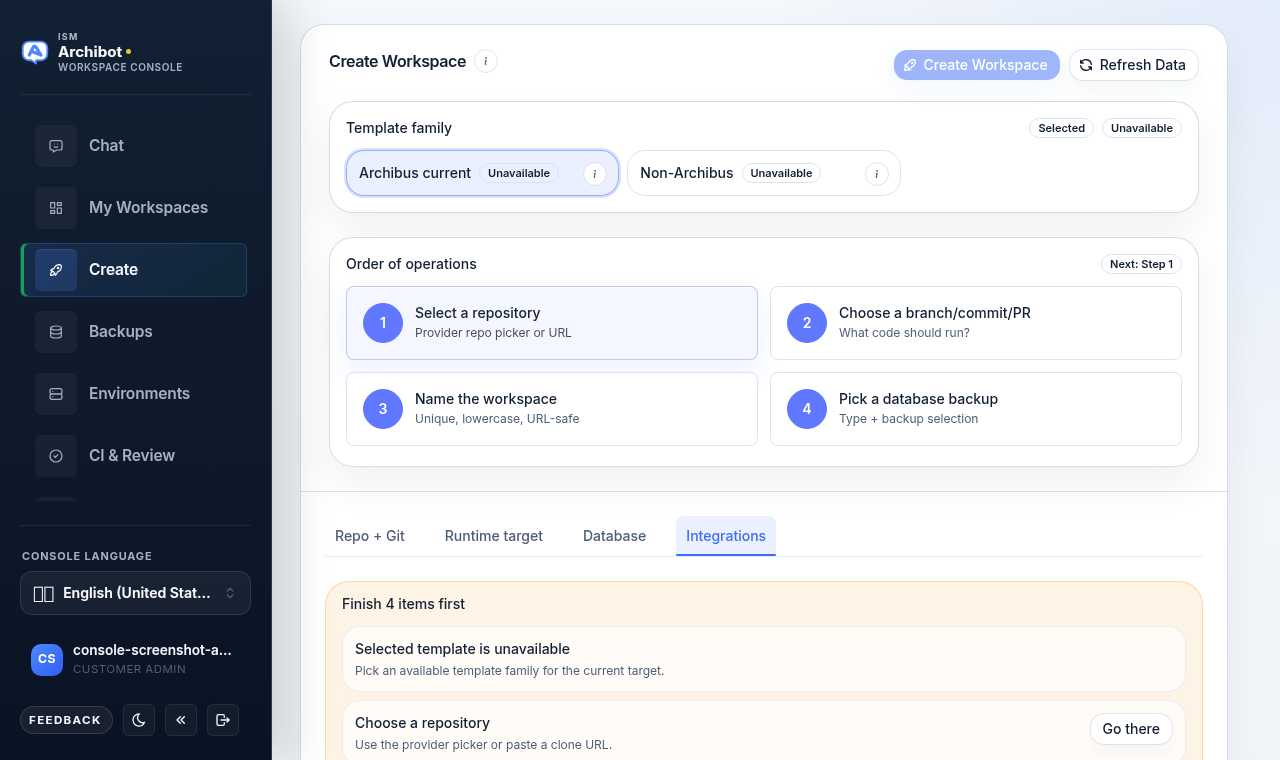
The Create tab walks you through one workspace at a time. It opens with a Template family selector and an Order of operations card, then four setup tabs underneath. You do not have to scroll the whole form: the numbered steps in the Order of operations card jump you to each section, and the create button stays disabled until every required step is staged.
Open Create from the left navigation, or go to /?tab=create.
Pre-flight checklist
Before you start, confirm:
- Account setup is not blocked and billing or trial access is approved.
- Prepaid workspace time and managed-AI credit are funded when your account uses prepaid access.
- An approved template family is selectable (see Catalog and readiness).
- The repository URL and branch are correct, or you have an approved WAR artifact to start from.
- Private Git credentials show valid clone access when needed.
- The WebCentral version profile matches the repository or WAR you are launching.
For most shared-hosted customers the workspace target is operator-managed. Console offers the target and operating-system choices that your account is allowed to use; you do not pick raw infrastructure.
Pick a template family
At the top of Create, choose the Template family for this workspace. Each family carries its own defaults for the toolchain, database expectations, and runtime image. The selector shows which families are available for the target your account is allowed to use; families that are not approved show as Unavailable.
If no family is selectable, the workspace target or template aliases are not attached yet. Resolve that first in Catalog and readiness before you continue.
Work the Order of operations card
The Order of operations card lists the required steps as numbered pills. Each pill is a button that scrolls you to that section, and it turns green with a check when the step is complete. The badge in the top-right shows either Ready to launch. or Next: Step N.
For an Archibus or repo-based workspace the steps are:
| Step | Pill label | What you set |
|---|---|---|
| 1 | Select a repository | Provider, credential, and the repository (or WAR source). |
| 2 | Choose a branch/commit/PR | The exact code the workspace runs. |
| 3 | Name the workspace | A unique, lowercase, URL-safe name. |
| 4 | Pick a database backup | Database type and the restore source, when the family needs one. |
DevOps-family workspaces show a shorter sequence (connect DigitalOcean, then name the workspace), and a repo-only family marks the database step optional.
Step through the four tabs
Below the card the setup splits into four tabs. Click a tab, or let an Order of operations pill jump you there.
Repo + Git
This tab is named Repo + Git for a Git source, or Source WAR when you switch to a managed WAR artifact.
- In Workspace source, choose Git repository to clone a repo, or WebCentral WAR to start from a packaged Archibus artifact.
- For a Git source, pick a Repository provider: GitLab.com, Self-hosted GitLab, GitHub.com, Self-hosted GitHub, Bitbucket Cloud, Self-hosted Bitbucket, Azure DevOps Services, or Other custom Git.
- Set up the Workspace Git credential for private repositories. Use Check now to validate clone access. Console shows credential health (for example, “Saved GitLab PAT validated.”) but never displays the saved token, app password, or private-key value after storage.
- Choose the Repository with Browse saved repos or Paste clone URL, then pick the Branch (Step 2: branch, commit, or pull request).
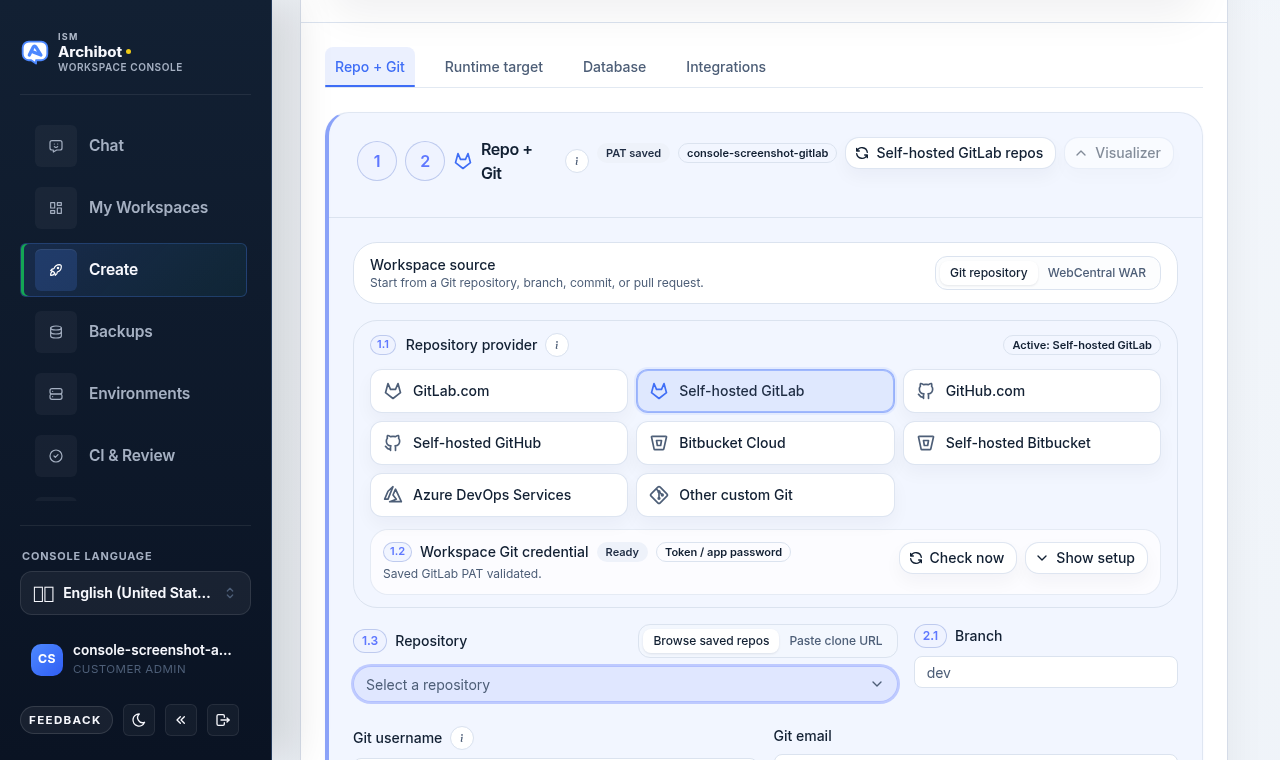
A repository visualizer is available on this tab (use Visualizer / Hide visualizer) so you can confirm the provider, branch, and clone target before you create.
For public GitLab.com or GitHub.com repositories you can paste the URL directly without a saved credential. For private repositories, follow the credential flow for your provider:
| Provider | Typical safe input | Do not paste |
|---|---|---|
| GitLab | Project URL, branch, saved PAT health state. | Raw PAT in tickets or docs. |
| GitHub | Repository URL, branch, saved PAT health state. | Raw PAT in screenshots. |
| Bitbucket | Repository URL, branch, saved app-password health state. | App-password values. |
| Azure DevOps | Organization/project/repo URL and branch. | PAT value outside the credential flow. |
| Custom Git | Pasted HTTPS or SSH URL, host, username. | Tokens or keys in shared notes. |
Start from a WAR artifact instead
When the workspace should start from packaged Archibus files rather than a repository clone, switch Workspace source to WebCentral WAR. The tab renames to Source WAR and the steps change:
- Choose a managed WAR artifact from the lookup, or paste a managed WAR object path that Console can reach. The WAR artifact location is stored privately.
- A WAR-backed workspace skips branch selection and repository cloning; Console passes the WAR artifact metadata to the runtime and expands it into the applications directory.
Use the lookup whenever possible. Paste a path only for a managed object-store artifact, never a public download link.
Runtime target
This tab holds the workspace name, size, operating system, and the Toolchain section.
- Set the Workspace name (Step 3). It must be unique, lowercase, and URL-safe. Generate Name can suggest one.
- Confirm Workspace size and Operating system. Console offers only the sizes and OS choices that the workspace targets returned for your account.
- In Toolchain, pick the WebCentral version profile that matches your repository or WAR. The profile sets Java, Gradle, Tomcat, and the matching supported license bundle in one move.
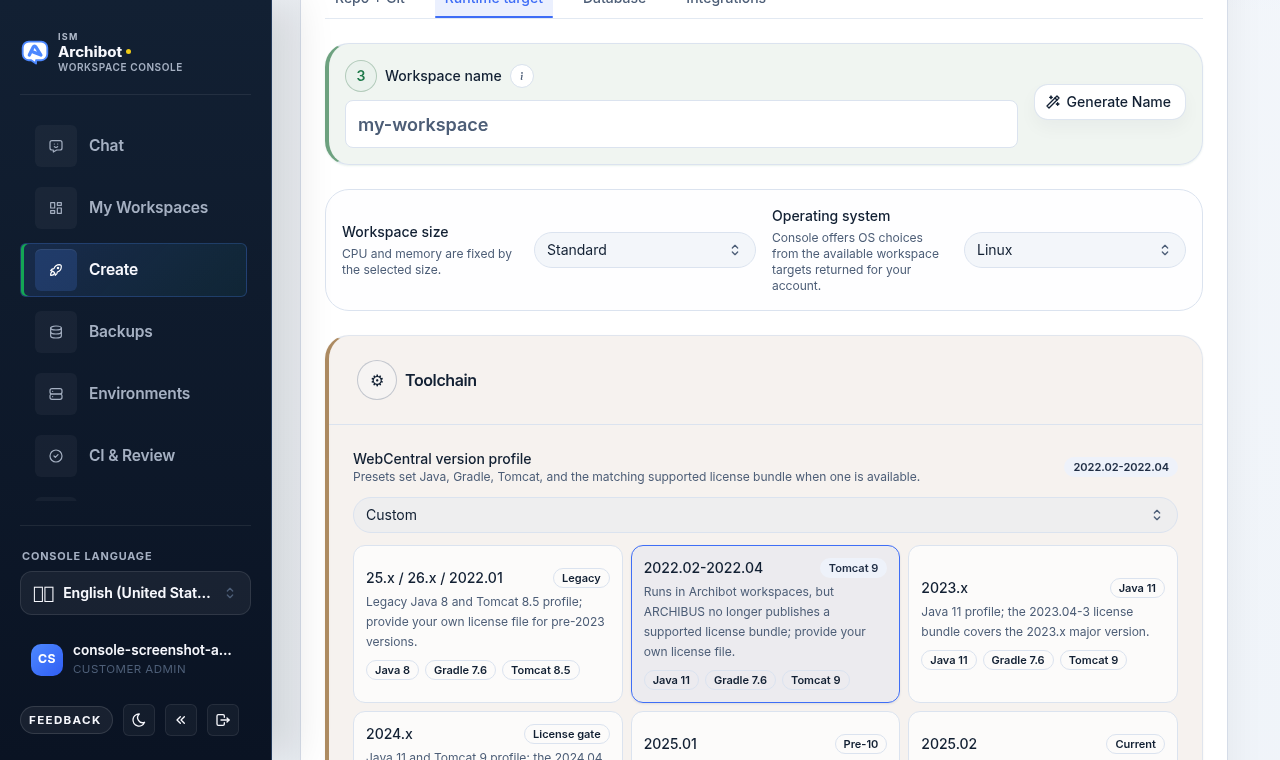
Each profile card shows its Java, Gradle, and Tomcat versions and a badge such as Legacy, Current, Pre-10, or License gate. Pick the profile that matches the WebCentral branch you are launching; for older branches the profile is a safer starting point than changing Java or Tomcat by hand. Use Custom only when an operator or project lead has given you a specific override.
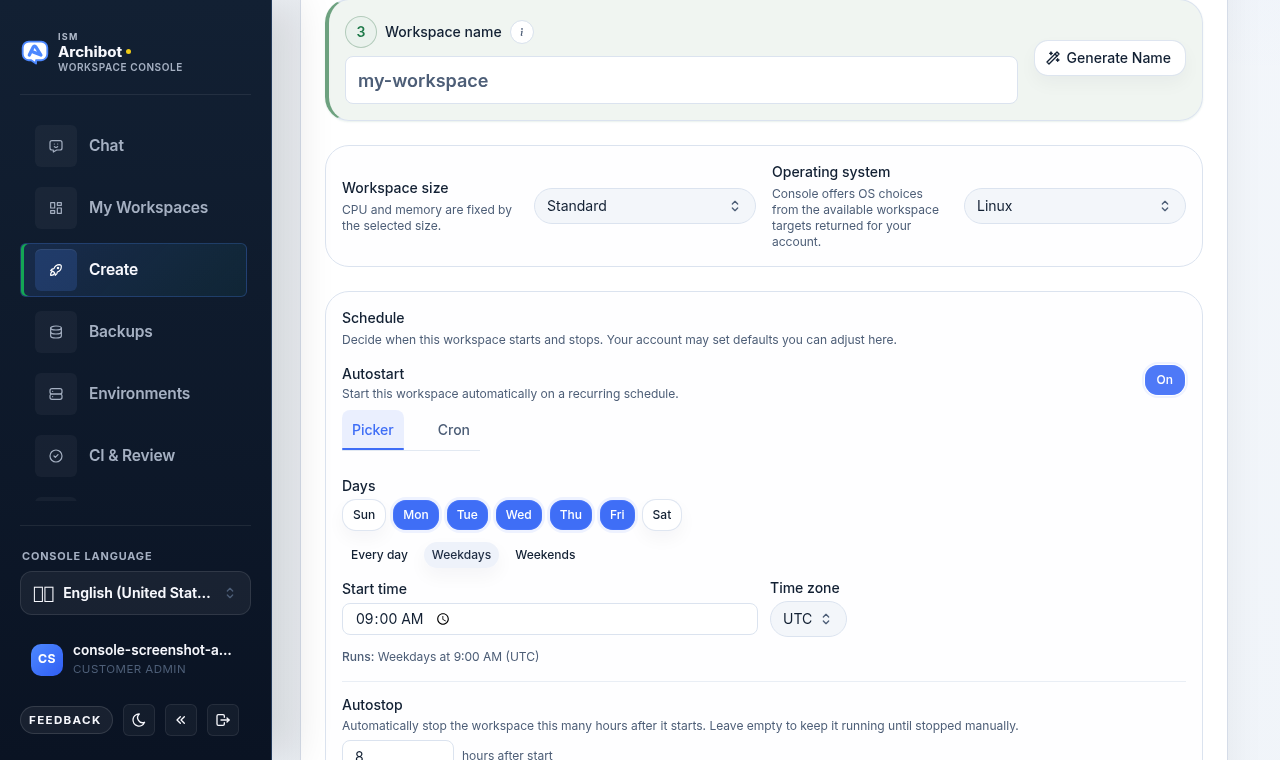
Schedule
Decide when the workspace starts and stops while you create it, in the Schedule card.
- Autostart is off by default, so the workspace starts when you open it.
Turn it on to start the workspace automatically on a recurring schedule, set
two ways that stay in sync:
- Picker — choose the days (or a preset such as Weekdays), a start time, and a time zone. Console builds the schedule and shows a plain-language summary (for example, Runs: Weekdays at 9:00 AM).
- Cron — enter a raw cron expression with format help and examples
(for example,
CRON_TZ=America/New_York 0 9 * * 1-5).
- Autostop defaults to 8 hours after start, so an idle workspace stops on its own. Clear it to keep the workspace running until you stop it manually.
If an operator has configured account defaults, those override these starting values when the form loads. You can change the schedule later from Manage your workspaces.
Database
- Choose the Database type: SQL Server, Oracle, or None. Database type is remembered per repository URL.
- When the family needs a backup, Choose database backup from the approved restore catalog. You can filter the catalog; uploads and repository associations also appear there. You may paste a Custom backup URL for a managed object-store backup.
- Database type set to None skips backup requirements for repo-only workspaces.
Database sidecars and backup restores require a Linux Kubernetes workspace target with database support. If your selected target does not support databases, Console tells you to pick a database-capable target. For more on choosing restore sources, see Backups and restore sources.
Integrations
The Integrations tab covers managed AI, secondary AI, and other connected services for the workspace.
- Managed AI access: use the managed Archibot proxy so the workspace can reach AI without you managing a key. Managed access does not store or reuse personal provider account login files.
- Bring your own key: when allowed, you can supply an Anthropic API key or bring your own key after launch instead of using the managed proxy.
- Other integrations (for example Atlassian API tokens) appear here when the template family supports them.
This tab is also where Console summarizes outstanding setup. When required steps are still open, it shows a Finish N items first card that lists each incomplete step with a Go there button.
Create the workspace
When the Order of operations badge reads Ready to launch. and every pill is checked, the Create Workspace button (top-right of the page) is enabled.
- Confirm the template family and the source, branch, name, and database selections.
- Resolve any Finish N items first entries.
- Click Create Workspace.
- Watch build status until the workspace is ready.
After you create, Console opens a build log view. Build output streams there while the workspace is provisioned; when the dev container starts, it switches to workspace startup logs and shows Build finished when provisioning completes. A successful create provisions the workspace, pods, PVCs, repo checkout (or WAR expansion), and any database restore. This log dialog is your first place to look if a build stalls.
If Console shows a validation error, fix that exact field before retrying. If the workspace is accepted but startup later fails, keep the workspace available for inspection unless an operator tells you cleanup is safe.
Open the workspace
- Go to My Workspaces.
- Wait for the workspace status to be ready or running.
- Open the workspace and its connection options from there.
If a connection link opens an internal service address or redirects somewhere your browser cannot reach, stop and report it. For day-to-day actions like start, stop, rebuild, and delete, see Manage workspaces.
Create blocked troubleshooting
| Blocker | What it usually means | Next action |
|---|---|---|
| Billing or prepaid balance | The account is not approved or funded for creates. | Ask a customer admin or operator to review Catalog and billing state. |
| Template family unavailable | No approved template family resolves for the selected target. | Pick an available family or review Catalog and readiness. |
| Target without database support | The chosen target cannot run database sidecars. | Choose a database-capable target, or set Database type to None. |
| Git validation failed | Repo URL, branch, or credential is wrong. | Update the repository or credential and use Check now. |
| WAR artifact required | No managed WAR is selected or pasted in WAR mode. | Select a WAR artifact from the lookup or paste a managed WAR path. |
| Finish N items first | A required Order of operations step is still open. | Use Go there on the launch-readiness card to complete each step. |
Related guides
- Catalog and readiness — confirm an approved template family and target before you create.
- Workspace presets — apply a known-good baseline to fill the wizard quickly.
- Backups and restore sources — choose the right database restore for the Database tab.
- Manage workspaces — start, stop, rebuild, and open workspaces after create.
- Customer admin setup — set up access, targets, and Git providers for your tenant.
Done When
- Billing or trial access is approved.
- An approved template family is selectable for your account.
- Repository (or WAR artifact) and branch are correct.
- The WebCentral version profile matches your repository or WAR.
- Database type and backup choice are correct.
- The Order of operations card shows every required step complete.