Restore Sources
Backups and restore sources
Review, upload, organize, and select the database, WAR, and repository-linked restore artifacts that Create Workspace can inject.
Last updated

What Backup Management is for
Backup Management confirms that Console can see the approved database, WAR, and repository-linked restore files before they are used in a workspace. Uploads and repository associations decide what Create can inject into a new workspace, so storage access issues usually show up here first — before they interrupt a workspace restore.
Use this page before the first workspace create when a customer needs seeded restore material, and any time you need to organize the restore catalog.
Who can do what
Reviewing the catalog is available to customer members and operators. Customer member access is required to upload, edit, associate, or delete backups. When you lack that access, the Upload control and the per-row management actions stay disabled. Service-token and storage internals stay operator-owned and are not exposed on this page.
Open the page and read the header
The page opens on Backup Management. The header carries two controls:
- Refresh — reload the catalog from storage.
- Upload — switch to the upload form. This is disabled if you do not have upload access.
A Workspace restore selected badge appears next to the title when Create has a restore source pinned from this page.
Read the catalog snapshot
The collapsible Catalog snapshot shows four metrics. Use Hide snapshot / Show snapshot to collapse or expand it.
| Metric | What it tells you |
|---|---|
| Catalog | Total artifacts visible to Create, with how many remain after the current inventory filters. |
| Managed uploads | Artifacts you uploaded directly, plus a count of object-storage backups also in the catalog. |
| Repository linked | Artifacts that have at least one repository association, plus how many storage buckets feed the catalog. |
| Workspace selection | The restore source Create is waiting on, if any. Shows None when nothing is pinned. |
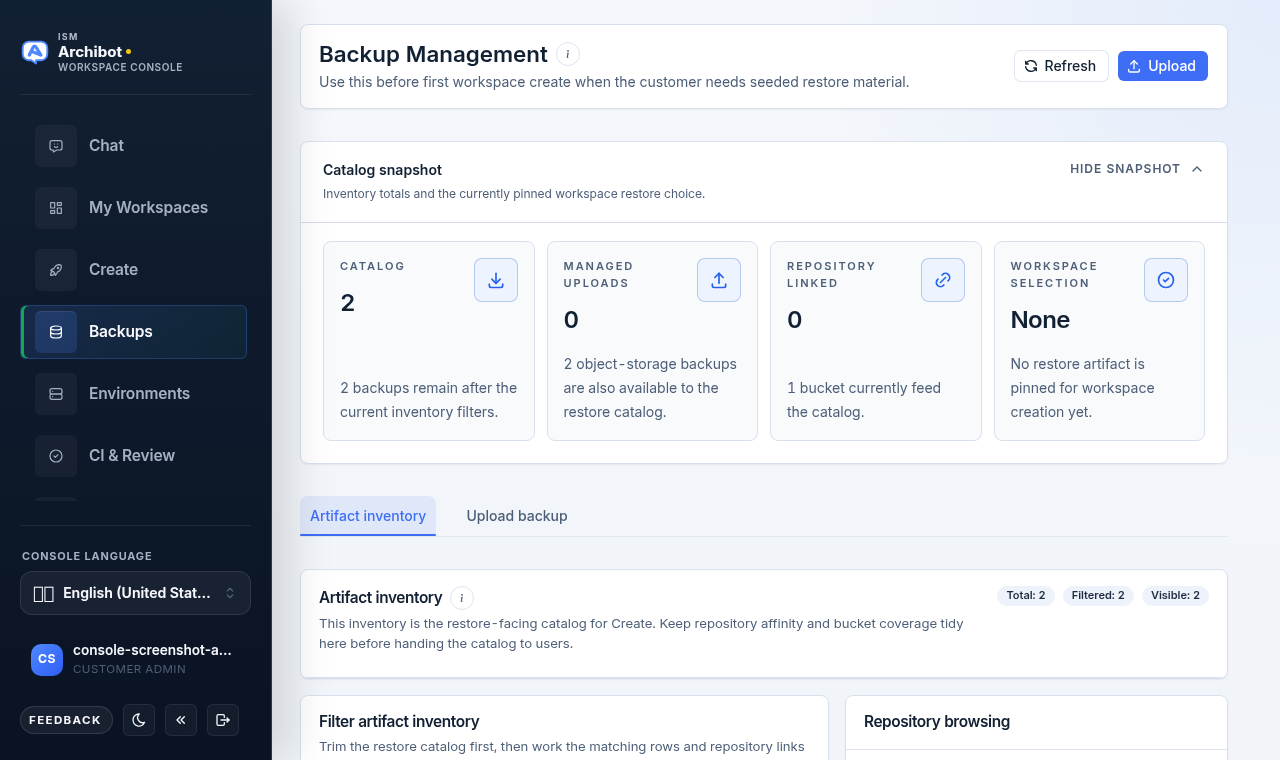
Move between the two tabs
Below the snapshot are two tabs:
- Artifact inventory — the restore-facing catalog with filters, sortable columns, and pagination.
- Upload backup — the form for adding a managed restore artifact. This tab is disabled without upload access.
Upload a managed backup
Managed uploads become restore candidates for new workspaces after the file and metadata are saved.
- Open the Upload backup tab (or use the Upload button in the header).
- Choose the Backup file.
- Choose the Database type — Oracle or SQL Server.
- Set a clear Display name and a Backup date.
- Add a Description so customers know what the artifact contains.
- Optionally fill Associate with repository (optional) with a clone URL so Create can recommend the backup automatically for that repo.
- Select Upload backup. A progress bar shows the upload percentage; the page returns to the inventory when it finishes.
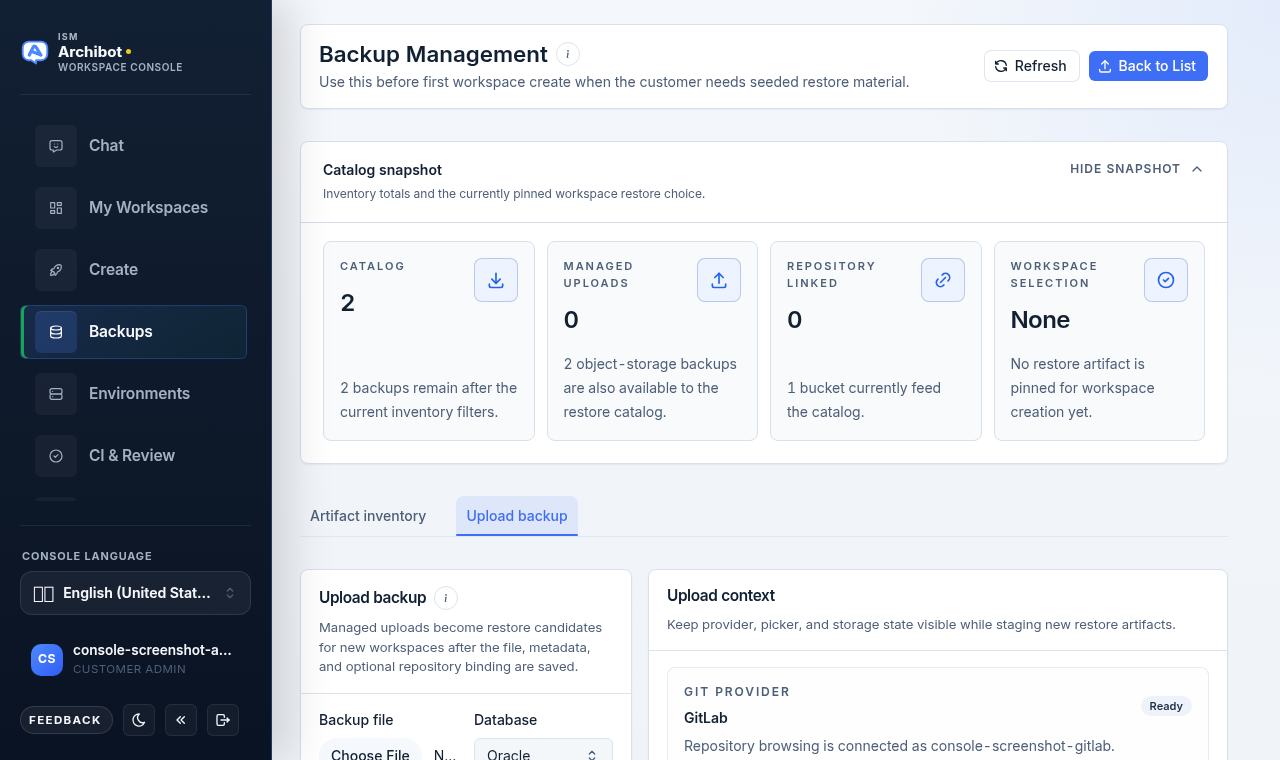
The schema defaults to AFM on upload; there is no schema field on the upload form. You can adjust the schema later from Edit backup.
Keep credentials and connection strings out of display names and descriptions. These fields are catalog metadata customers read when choosing a restore point.
The Upload context panel on the right keeps the connected Git provider, the current workspace backup selection, and the catalog buckets visible while you fill the form. It is read-only context, not an extra step.
Work the artifact inventory
The Artifact inventory tab is the restore-facing catalog for Create. The filter card has six controls:
| Filter | Use it to |
|---|---|
| Search | Match on name, URL, description, or repo. |
| Source | Narrow to managed uploads or object storage. |
| Database | Limit to Oracle or SQL Server. |
| Association | Show repository-linked or not-linked artifacts. |
| Repository | Match a specific repo path, such as gitlab.example.com/group/repo. |
| Bucket | Limit to one storage bucket. |
A Reset control appears once any filter is active. The list header shows Total, Filtered, and Visible counts so you can confirm the filters are doing what you expect.
Selecting a row keeps its details — database type, bucket, and linked-repo count — in the Selected artifact card while you work the catalog. Object storage buckets appear only when bucket metadata is attached to the current results.
Sort and page through results
The inventory table columns — Name, DB, Size, and Uploaded — are sortable; select a column header to toggle ascending or descending. Below the table, set the Page size (10 through 1000) and move through results with Prev and Next. The footer shows the current page and total match count.
Select a restore source for a workspace
- Find the artifact in the inventory.
- Click the row, or use Select for workspace in the row actions.
- The selected artifact follows you back into the Create flow until you change it, and the snapshot’s Workspace selection metric updates to match.
When Create is actively waiting for a restore source, the page shows a notice and the inventory is pre-filtered to backups linked to the repository you are launching from. If none are linked, Console falls back to the matching database catalog.
Manage repository associations
Linking a backup to a repository lets Console recommend it automatically when that repo is used in Create.
- In the row actions, choose Manage associations (the link icon). The associations dialog opens for the selected backup.
- Existing links appear under Current repositories. Remove one with the trash control; Console asks you to confirm before removing it.
- To add a link, choose a Provider — GitLab, GitHub, Bitbucket, or Azure DevOps — then pick a repository from the connected provider.
- If the provider is not connected, tick Use custom URL and paste the full clone URL instead. You can also Connect the provider or Refresh the repo list from inside the dialog.
- Set a Priority and, where appropriate, leave Default for this repo checked.
- Select Add association (or Save association when updating an existing link).
- Close the dialog when you are done.
Repository browsing needs a connected provider; without one, use a custom clone URL. The dialog shows whether the provider is connected so you know if lookups are available.
The upload form’s optional Associate with repository field is the same association created here — you can seed the first link during upload and refine it later.
Edit a backup
Use Edit backup (the pencil icon in the row actions) to update the catalog details customers see.
- Open Edit backup for the artifact.
- Update the Display name, Database type, Schema (defaults to AFM), and Description.
- Select Save changes.
The display name is required; the rest are optional metadata.
Delete a backup
Use Delete (the trash icon) to remove an artifact from the catalog. Console asks you to confirm with a native dialog before deleting. Deleting a backup removes it as a restore candidate, so confirm it is not pinned for an active workspace launch first — check the Workspace selection metric in the snapshot.
Related guides
- Create the first workspace to use a restore source in a launch.
- Workspace presets for reusing a known backup shape.
- Catalog and readiness for billing readiness before create.
- Manage workspaces to operate workspaces after they launch.
- Troubleshooting when a restore source is not appearing for Create.
Done When
- Console can see the approved restore files before a workspace uses them.
- Uploaded backups carry a clear display name, database type, and backup date.
- Repository associations point each backup at the repo Create should prefer.
- The selected restore source is confirmed before launching Create.